

If you’re running Google Ads for your business, you’re probably familiar with the Google Keyword Planner tool. But are you getting the most out of the tool, and do you know how to use it to unlock the important insights that you need to supercharge your Google Ads campaigns?
In this blog post, we discuss all you need to know about the Google Keyword Planner tool, including:
How to use the Google Keyword Planner tool for keyword research
How to sort through and filter your keywords
How to forecast keyword costs and ad spend
How your advertising status affects your access to keyword data
Advanced tips and hacks for the Google Keyword Planner tool, and
Alternatives to the Google Keyword Planner tool
My goal is to help you go beyond the surface level, and maximize the value that you get out of the Google Keyword Planner Tool. Let’s get started!
What is the Google Keyword Planner tool?
In a nutshell, the Google Keyword Planner tool is a free tool that Google provides for advertisers who want to build Search campaigns.

With this tool, you can research keywords, forecast keyword costs, and more. While most people think of the Google Keyword Planner Tool as a basic tool, it actually comes with plenty of advanced functionality that most advertisers aren’t tapping into.
Why should you use the Google Keyword Planner tool?
First and foremost, the Google Keyword Planner tool is completely free. On top of that, the data that you get from this tool comes directly from Google, so I’d argue that this data is more reliable than the data that you’d get from a third-party tool.
Now, don’t get me wrong - I’m not saying that premium keyword research tools aren’t worth your while. These can be useful in helping you research and build your campaigns as well; that said, it makes sense to explore the Google Keyword Planner tool in its entirety before concluding that it’s insufficient for your needs. You know what they say: don’t knock it till you’ve tried it!
How to use Google’s Keyword Planner Tool
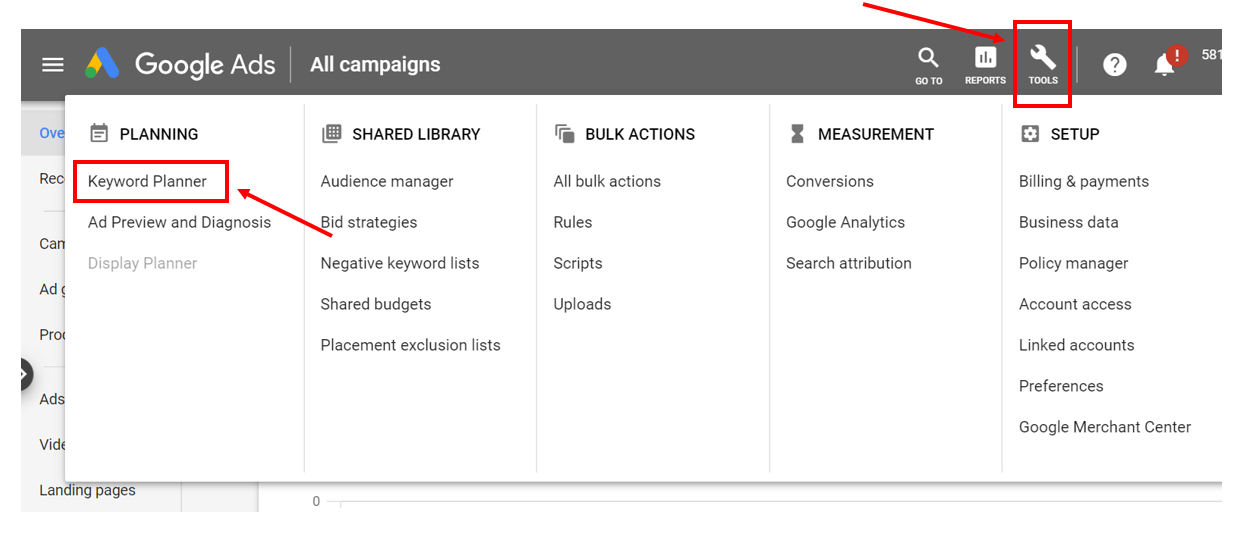
To access the Keyword Planner tool, log in to your Google Ads account, then click on “Tools” from the top menu. Then click on “Keyword Planner” under the “Planning” category.
Quick aside: If you don’t have a Google Ads account, you can quickly create your first account from the Google Ads site.
From here, you’ll get redirected to a page where you can choose from “Find new keywords” or “Get search volume and forecasts”. There are actually multiple ways in which you can come up with new keyword ideas, and we’ll walk you through each of these in this section.
1. Using your URL
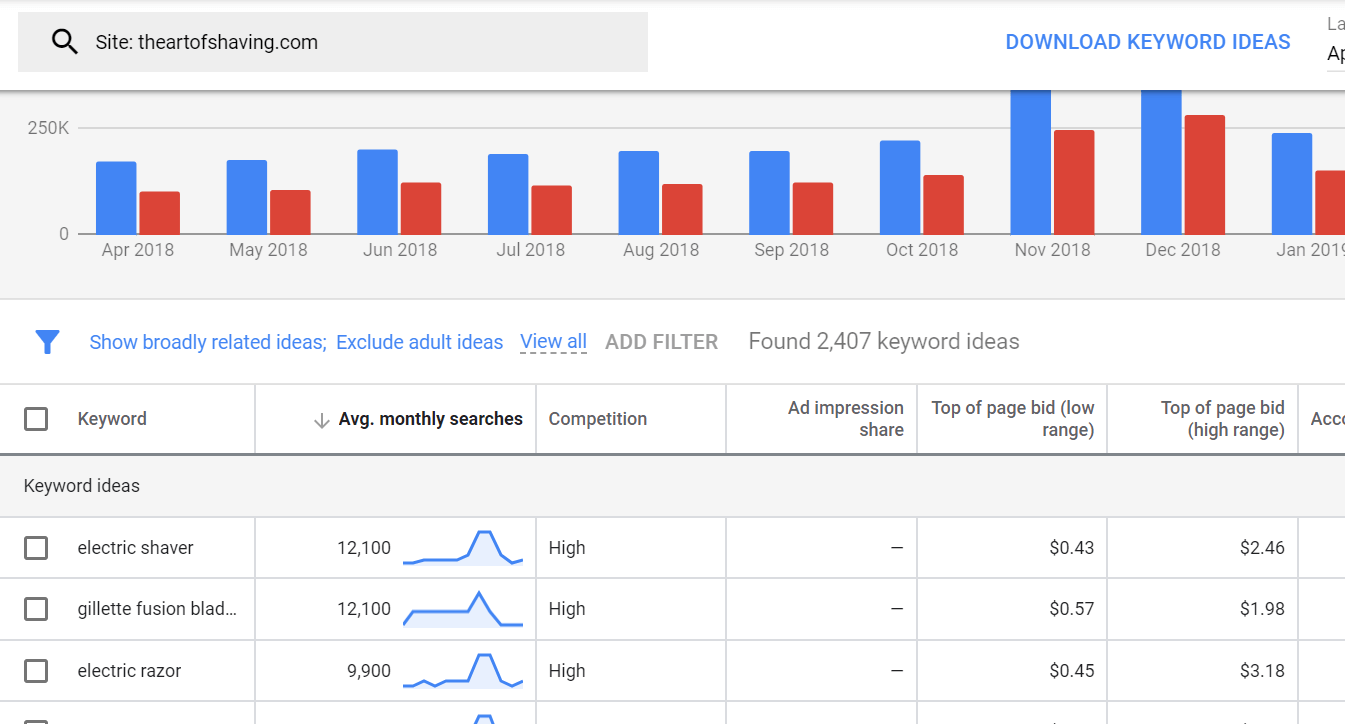
To research keywords using your URL, click on “Find new keywords”, then enter your URL.

The Google Keyword Planner tool will automatically spit out a list of keywords related to your site, and you can click on “Average monthly searches” to sort them by volume:

2. Using your competitors’ URLs
On top of doing keyword research with your own URL, you can also plug in your competitors’ URLs to see if there are any interesting keywords that you might want to bid on.
You don’t have to navigate back to the original page in order to do this. Just click on the search bar where your URL is displayed, enter your competitor’s URL, then click on “Get results”.

Again, sort by “Average monthly searches” to see the terms that have the most volume:
3. Using industry-related keywords
URLs aside, you can also research additional keywords to target by entering a seed phrase or keyword. For instance, if I search for “shaving cream”, here’s what I get:

Now, note that the suggested keywords fall into two categories. At the top of the results, Google will display a list of broadly related keywords (in this case, these include “aftershave”, “razer blade”, etc).
When you scroll down, you’ll also see the specific keyword you searched for, and a list of keywords that’s more closely related to that keyword below:

If you don’t want to look at the broadly related keywords, you can actually turn these off. Click on the bar above:

Then click on the button that says “Show broadly related ideas”. From the drop-down list that appears, click on “Closely related ideas”:

If you’re searching using phrases instead of URLs, you can also input multiple phrases at one time. Simple key in all the phrases you want into the bar:

And scroll down to see the related keywords for each keyword that you’ve plugged in.
Understanding key terms used in the Google Keyword Planner
As you browse through the keywords that the Google Keyword Planner pulls up for you, you’ll also want to look at the metrics that the tool provides, including Average Monthly Searches, Competition, Ad Impression Share, Top of Page Bids, etc.
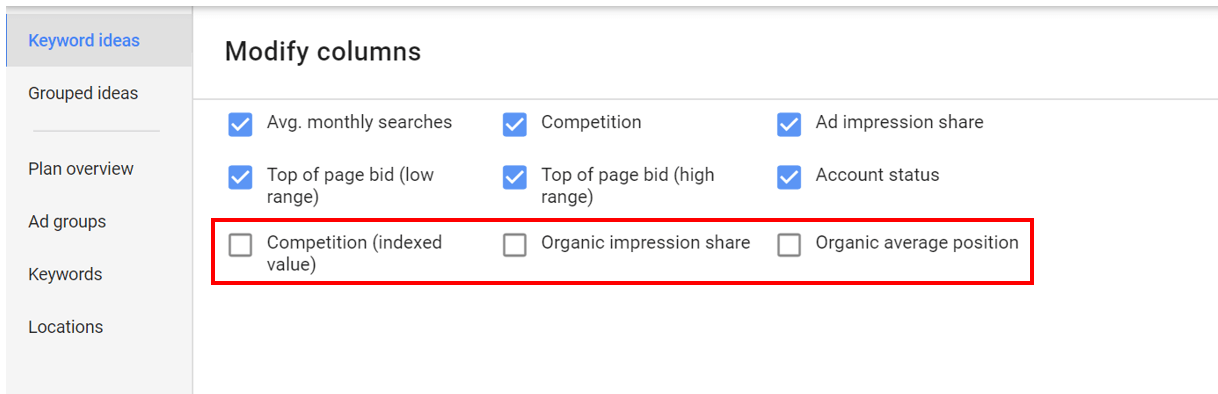
Note that not ALL of the metrics show up in your dashboard by default. To customize the metrics that you see, click on the Columns icon:

Then check the last three boxes:
Average Monthly Searches
The Average Monthly Searches refers to the average number of times people have searched for a keyword and its close variants.
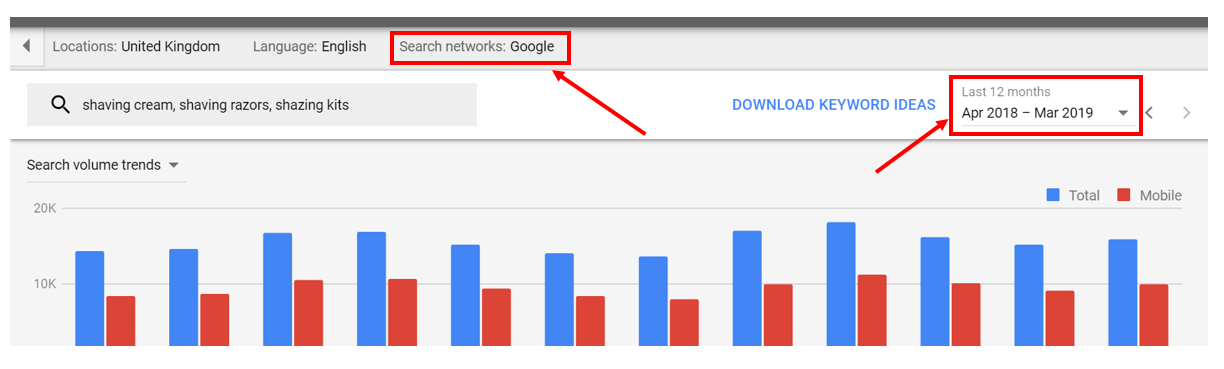
Note that this number will vary depending on the location, month range, and Search Network settings you’ve selected. By default, the number of searches for a term or keyword is averaged over a 12-month period, and Google looks exclusively at its own search network in determining this number. That said, you can change the time period and change the Search Network settings to include Google and its search partners if you’d like:
Competition
The Competition metric is listed as low, medium, or high, and this refers to the number of advertisers that shows on each keyword (relative to all keywords across Google). Again, this data is specific to the location, month range and Search Network targeting that you've selected.
Generally speaking, Average monthly searches and Competition tend to be inversely proportional. The more searches a keyword gets per month, the more attractive it’s deemed, and the more advertisers will bid on it. All things being equal, targeting keywords that have high Competition will definitely cost you more than targeting keywords that have medium or low competition.
PS: I’ll explain exactly why the Competition metric isn’t important to focus on later in this article, but for now, just know that you don’t need to put too much stock in it.
Competition (Indexed Value)
Competition (Indexed Value) shows how competitive ad placement is for a keyword, specific to the location and Search Network targeting options that you've selected. Here, the level of competition is ranked from 0-100, based on the number of ad slots filled divided by the total number of ad slots available. Basically, you can take this metric to be a more precise way of gauging the competitiveness of a keyword.
Ad Impression Share
Ad impression share refers to the number of impressions you've received divided by the total number of searches for the location and network you’re targeting that matched the keyword exactly in the last month. These are for keywords that you’re already targeting and bidding on. Assuming you’re looking at this metric for keywords that you haven’t used in your campaigns, you’ll see that the metric shows up as a dash (-).
Top of Page Bids
Top of page bid (low range) and Top of page bid (high range) refers to how much advertisers have historically paid for a keyword’s top of page bid, based on your location and Search Network settings. The high range is an approximation of the 80th percentile, while the low range is an approximation of the 20th percentile.
While these are nice to have, you can get more accurate data about how much you’ll potentially have to bid for your keywords with Google’s forecasting tool. More on that in a bit!
Organic impression share
Organic impression share refers to the percentage of times a listing from your website shows up in web searches for a keyword. Google arrives at this metric by dividing the number of web searches that showed a listing from your website by the total number of searches for that keyword idea.
Now, you might be wondering: Isn’t this more relevant to SEO? What has this got to do with running paid ads?

Yes, you’re right to say that Organic impression share deals with SEO, not PPC. But here’s the thing - SEO and PPC actually go hand in hand, and bidding on a keyword that you’re already ranking for might actually be a good strategy.
If you’re interested to learn more, check out this case study, which shows that keywords with a presence on both paid and organic results bring about a combined incremental click through rate.
Here’s what the case study found: keywords that had both a paid and organic presence achieved CTR of 8.93% for paid search and 5.10% for organic search. In comparison, paid keywords and organic keywords that focused solely on their individual tactics only achieved 8.08% and 4.48% CTR respectively, which translates to a 10% to 13% increase in CTR from using both paid and organic tactics.
If you’re wondering how this works, basically, paid keywords with an organic presence tend to have a higher Quality Score than paid keywords without an organic presence. This results in lower Costs Per Click (CPC), higher click through rates, and more profitable campaigns.
The bottom line: Organic impression share might not be as important a factor as Average Monthly Searches or Competition, but you should still take it into consideration when evaluating potential keywords and deciding which to bid on.
Organic average position
Organic average position shows how listings from your website rank compared to listings from other websites, and Google calculates this metric by taking the average top position of your listing (or multiple listings) for each web search for a particular keyword.
Again, this wouldn’t be a make-or-break factor when you’re shortlisting keywords to bid on. But if you’re comparing two keywords that have roughly the same Average Monthly Searches, then it makes sense to look at this metric to gauge which keyword will give you more bang for the buck.
Sorting through and filtering your keywords
Continuing from where we left off, after plugging “shaving cream”, “shaving razors” and “shaving kits” into Google Keyword Planner, this gives me a whopping 1,962 keyword ideas. After I’ve toggled the Keyword Planner to showing only closely related ideas, I’m still left with 509 ideas. Now, it’s time to sort through and filter the keywords, so I can hone in on the most attractive keywords to target.
To do this, just click on the filter funnel on the left of the blue bar, and this will bring up a whole menu of filtering options:

Here, most eCommerce store owners would sort their keywords based on “Avg. monthly searches” and “Competition”, with the goal of shortlisting keywords which have:
A high number of Average monthly searches, and
Low to medium competition
That said, I personally DON’T recommend using this approach, for a number of reasons.
First and foremost, the Competition filter doesn’t provide much detail, and isn’t very descriptive. While you can theoretically use the Competition (indexed value) filter to get a better gauge of a keyword’s competitiveness, this doesn’t always work out as well.
For instance, in the screenshot above, you can see that both keywords “shaving cream” and “palmolive shaving cream” both have the same indexed value (100), so this metric doesn’t help you choose between the two keywords in any way.

On top of that, whether a keyword is mildly, moderately or extremely competitive doesn’t have any real bearing on whether you’ll succeed in your PPC campaign. Now, most eCommerce store owners automatically assume that low competition keywords are low-hanging fruit that they can capitalize upon, but in all honesty, this is unlikely to be the case.
Think about it: pretty much EVERYONE knows how to sort keywords according to traffic volume + Competitiveness. So if a keyword has a low amount of Competition, this probably indicates that the keyword brings about lower quality traffic, and isn’t profitable (instead of indicating that it’s a “hidden gem”).
Bearing this in mind, what your likelihood of success really comes down to is:
How good your conversion rate is (as compared to that of your competitors), and
How much value you get from a customer.
If your conversion rate is better than your competitor’s (or at least in line with them), and the same goes for your Average Order Value (AOV) and Customer Lifetime Value (LTV), then you can definitely succeed at Google Ads, EVEN if you’re bidding on keywords that are highly competitive.
Moving on, here’s the last reason why you shouldn’t rely on the Competition metric: in 99% of cases, it’s impossible to find keywords that are both high in traffic, and have low/medium Competitiveness. If you’re in a niche industry or an untapped market, there’s a slim chance that these sort of keywords will exist, but if you’re in a competitive market with thousands of sellers, you can forget about it.
For instance, in this example, after I filter my keywords to exclude keywords that get less than 200 searches per month, I’m left with just 11 keywords, and all of them are highly competitive:

To recap, it’s not ideal to use Competitiveness to filter your keywords, because:
It doesn’t provide much detail
It doesn’t have any real bearing on whether you’ll succeed in your Google Ads campaign
It’s pretty much impossible to chance upon keywords that are high in volume and have low/medium Competitiveness
So what should you do instead? I recommend just filtering based on traffic, and then adding another filter to sieve out the keywords that you’re already bidding on.
Doing this is simple - just click on the filter funnel on the left of the blue bar, and click on “Exclude keywords in my account”:

Voila - now you don’t have to go back and forth and cross-check your keywords; if you see a good keyword that you think is worth targeting, you can click on the checkbox to select it, then add it to a new ad group and take it from there:

Forecasting your keyword costs and ad spend
Now that you’ve identified the keywords that you might want to target, let’s do a forecast to gauge how much you’ll spend on these keywords.
To do this, navigate back to the Google Keyword Planner tool, then click on “Get search volume and forecasts”. You can either enter your keywords, or upload an entire file:

Now, Google will work out your max CPC and generate an estimated number of conversions based on this. If you mouse over the question mark icon behind “max. CPC”, this explains that the performance forecasts are based on a default max. bid that’s calculated from your average bid across all campaigns.

In my case, my average bid is $0.31, and while this does generate some conversions, 15 conversions is hardly anything to get excited about.
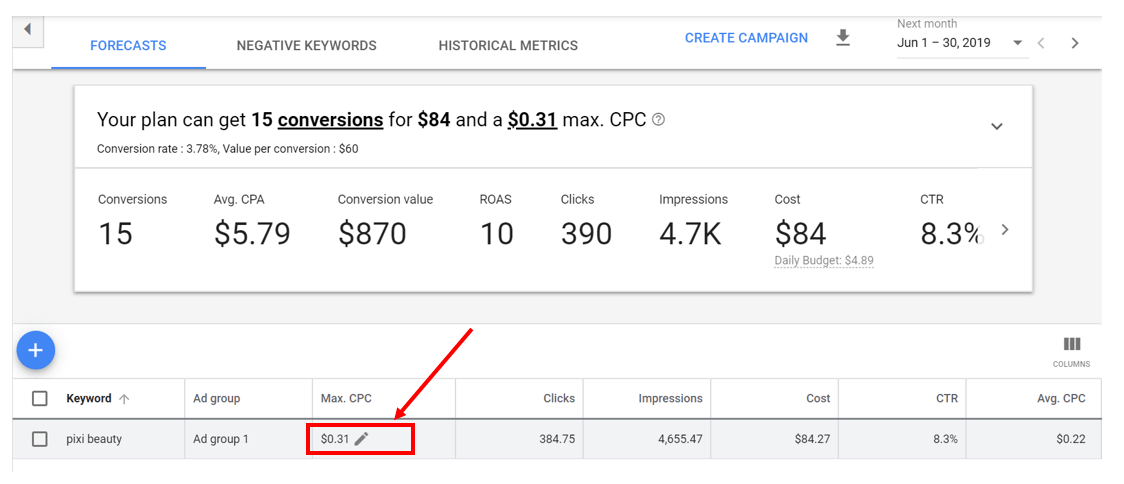
So I’ll go ahead and bump up the max bid by clicking on the edit icon:

And this increases the conversions I’ll get:

Now, note that your conversion rate and value per conversion are also generated based on your account’s historical values. To fine-tune your forecasts, go ahead and edit these two figures.

For example, say you run an eCommerce store selling outdoor gear, and you’re creating a forecast for two search terms: “carabiner for hiking” and “waterproof backpacking tent”. Obviously, the second search term will generate a larger Average Order Value (AOV) and a larger profit margin than the first, so it makes sense to allocate a larger value per conversion to the second term.
To add in more keywords, click on the blue “+” symbol, and add more keywords to your plan:

To look at the breakdown of your (likely) results via device and location, click on “Plan overview” from the left panel:

By default, the Keywords section shows an overview of your Cost, Clicks, and Impressions, but you can click on the drop-down menus to display other metrics such as Average CPC and CTR.

The same goes for the Device section - by default, this shows an overview of the Cost, Clicks and Impressions by device, but you can click on the respective metrics to swap them out:

For instance, I’ve swapped out the Cost metric for CTR and the Clicks metric for Average CPC in this screenshot:

Here, you can see that searches who view your ads on tablets have a higher CTR, and a lower CPC as compared to those who view your ads on mobile phones or computers. Bearing this in mind, you might consider setting up a standalone campaign targeting only tablets, and see if this brings you a higher Return On Ad Spend (ROAS).
Finally, on this same page, there’s also a Locations section that gives you some pretty interesting data on where your potential customers are likely to come from. In this particular campaign, I’ve set the Location targeting to the UK, so it’s not surprising to see that the top province is England:

When I swap over to Top counties, though, this gives me a nice snapshot of the areas in which my ads are likely to be clicked on:

How your advertising status affects your access to keyword data
Now, assuming that you’ve been running your Google Ad campaigns for quite some time now, you can easily follow along using your Google Keyword Planner tool, and get access to the exact same data that I’m getting on my end.
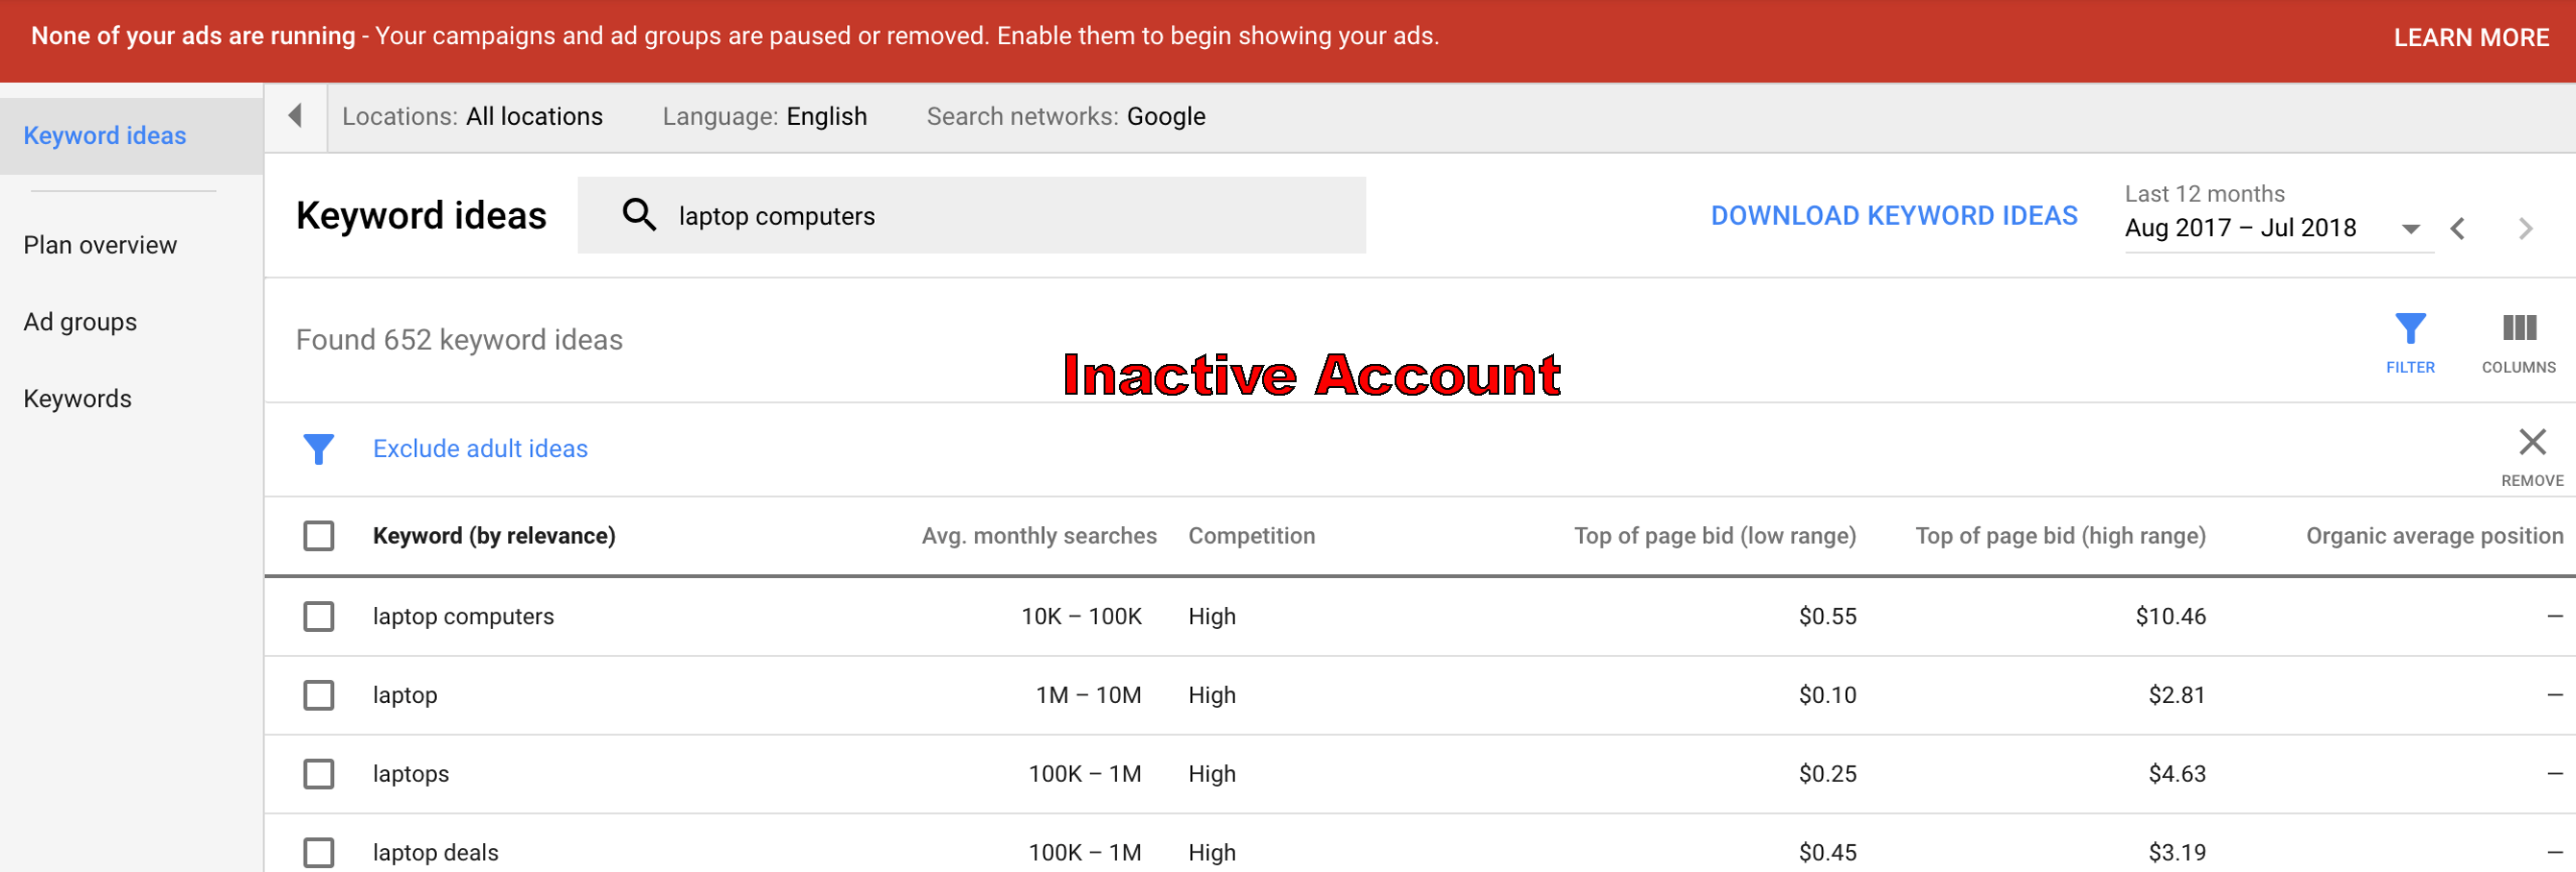
But if you’ve just created a new account and you haven’t started running ads yet, you’ll see something COMPLETELY different:

Basically, when you use the Google Keyword Planner Tool on an inactive account, Google provides you with fewer metrics. On top of that, the metrics that you DO get are less detailed as well.
For instance, under Average Monthly Searches, the tool will cite a range instead of a specific number. Check out the screenshot above: this pegs the number of searches for the term “laptop computers” to be between 10,000 and 100,000, which is quite a wide range.
Now, say you’re setting up a new eCommerce store (on top of your existing one!) to diversify your offerings and experiment with selling new products. Here, it’s perfectly fine to create a new Google Ads account to keep things organized, but remember to use your old account to do keyword research so that you get access to more data and analytics.
Google Keyword Planner: Advanced tips and hacks
Awesome! You’re now up to speed on how to use the Google Keyword Planner tool.
In this section, I’ll walk you through some advanced tips and hacks that you can use with the tool. Take it from me… the Keyword Planner tool is more versatile than you think!
1. Identify questions related to your keywords
Now, people generally target shorter or medium length keywords with PPC campaigns, and target long-tail keywords using blog articles, but if you want to try your hand at running ads for long-tail keywords, that’s fine as well.
Unfortunately, there’s no function in the Google Keyword Planner Tool that lets you filter keywords based on word count. Since most long tail keywords are worded as questions, however, you can work around this by identifying keywords that start with “who”, “what”, “why”, “when”, “where”, and “how”.
To do this, click on the filter icon and select “Keyword text”, then input each term.

Once you’ve keyed in all the relevant terms, you’ll have a list of long tail keywords that you can check out:

Pretty cool, right?
2. Identify keywords related to your brand name
Most eCommerce store owners simply search for keywords and generate keyword ideas using terms related to their industry/niche, but if you’re an established store, running ads on your brand name might make sense as well.
For example, say Pixi Beauty, a UK-based skincare brand, is thinking of running branded PPC ads. Now, simply keying in the term “Pixi Beauty” into the Google Keyword Planner Tool will give you a TON of options:

Now, you might be wondering… I’m already ranking for my branded keywords in Google’s organic search results. What’s the point of paying to run ads on these same keywords?
Well, first and foremost, there’s only so much you can do with your organic listings. Because these are catered to the general public, they’re typically pretty generic and vanilla. When you’re running ads, on the other hand, you can get creative and craft a message that really entices them to your site. Using ads, you can also plug any ongoing sales and promotions, showcase your customer reviews, and more.
More importantly, by running branded ads, you can also snag that number one spot on Google, and get more click throughs and conversions.
Here’s an example: when I search for Pixi Beauty, here’s what I see:

The top listing is actually an ad from iHerb, and Pixi Beauty’s website appears below that. Now, my thought process might be something along the lines of:
I need to stock up on my supplements anyway… I might as well shop on iHerb, so I can get everything in a single order.
OR: Wow, 10% off your first order? Alright, I’m definitely buying from iHerb.
The bottom line? To capture as many conversions as possible, and make it more difficult to competitors to steal a slice of your pie, make sure you research and bid on branded keywords.
3. Identify highly specific keywords
If you’re trying to come up with more keywords to target, but there’s a specific term that you definitely want to include in your keywords, there’s an easy way of doing this using the Google Keyword Planner Tool.
Here’s an example: say I search for “Pixi Beauty”, but Google spits out a couple of unrelated keywords for me, including “Korean beauty products” and “Beauty products online”:

Now, since I want to include the word “Pixi” in my keywords, I can simply pull up the “Keyword text” filter function, and type in “Pixi” (yep, this is the same technique we previously used to identify long-tail keywords).
Once the filter is applied, all my remaining search terms will contain the term “Pixi”, and Google will no longer show synonyms and other terms in my results:

Alternatives to the Google Keyword Planner tool
All in all, you can use the Google Keyword Planner tool to do some solid keyword research, and build a good foundation for your Google Ad campaigns.
But if you want to take things to the next level and really crush it with your keyword research, you can always use other paid tools in conjunction with the Google Keyword Planner tool. Here are 3 of the best PPC keyword research tools in the market:
1. iSpionage
iSpionage is one of the best-known PPC keyword research tools out there, and they’ve got an impressive clientele list, including Microsoft and Autodesk.

With this tool, you can:
Find out how much your competitors are spending on Google Ads
Find out how many ads your competitors are running
Find out what keywords your competitors are bidding on
Find out how your competitors group their keywords, ads, and landing pages
Find out your competitors’ most profitable search terms
Find out your competitors’ most effective ads
Price: A basic plan at iSpionage starts from $49 per month.
2. SEMrush
SEMrush is another reputable tool, and it’s used by 3,000,000+ marketers from across the globe.

While you can use SEMrush to take care of various aspects of your marketing (including social, SEO, and more), SEMrush’s PPC Keyword Tool will be the most relevant for eCommerce store owners who are trying to level up their ad campaigns.
With this tool, you can organize keywords at the campaign and ad group level, quickly set negative keywords, use the auto-grouping feature to create ad groups with a single click, and import your campaign plan into the Google Ads Editor. PPC Keyword Tool aside, you can also use SEMrush’s Ad Builder tool to research the competition and craft more effective ad copy.
Price: A basic plan at SEMrush starts from $83 per month.
3. SpyFu
Like iSpionage, Spyfu allows you to search and identify the keywords that your competitors are bidding on. On top of that, the tool also gives you access to EVERY ad variation that your competitors have created and launched in the last 12 years. Amazing, or what?

Personally, I’ve used all three tools on this list, and from my experience, Spyfu has the most accurate cost data. Basically, all these tools estimate their information about what your competitors spend on their ads using limited data, so the numbers you see are approximated figures, NOT the real amounts. But what I’ve done is to use this tools to compare how much the tool thinks my clients spend, vs how much my clients actually spend. All in all, Spyfu has the most accurate spend estimates, although they obviously aren’t 100% accurate.
Lastly, while SpyFu comes with a ton of advanced features and functionality, one thing that’s particularly helpful to do is to use the tool to run an AdWords Advisor report on your closest competitor. Basically, this is a special domain analysis report that breaks down all the improvements that your competitor could make in their PPC campaigns. With this report, you can uncover and learn from your competitors’ weaknesses, and leapfrog ahead of them.
Price: A basic plan at SpyFu starts from $33 per month.
Conclusion
Whew! That’s a lot of content we’ve just covered, so let’s do a quick recap.
For eCommerce store owners who are researching new keywords for their PPC campaigns, you can use the Google Keyword Planner tool to find keywords using:
Your own URL
Your competitors’ URLs, and
Industry related keywords
You can filter your keywords using a range of metrics, including Average monthly searches, Competition, Ad impression share, Top of page bid, Organic impression share, Organic average position, etc, but your best bet is to just look at Average monthly searches, and go from there. There’s also the option for you to exclude keywords that are already within your account.
To gauge how much you might spend on certain keywords, you can use Google Keyword Planner’s forecasting tool. In order to improve the accuracy of your results, tweak the max CPC, conversion rate and value per conversion accordingly.
Finally, some lesser-known or less popular functions of the Keyword Planner tool include:
Searching for long tail keywords
Searching for (and bidding on) brand keywords
Searching for specific keywords (without synonyms)
Alright, that’s all I’ve got for you on the topic of the Google Keyword Planner. Over to you: what’s your favourite feature of the Google Keyword Planner? Do you use this tool alone, or in conjunction with other keyword research tools?